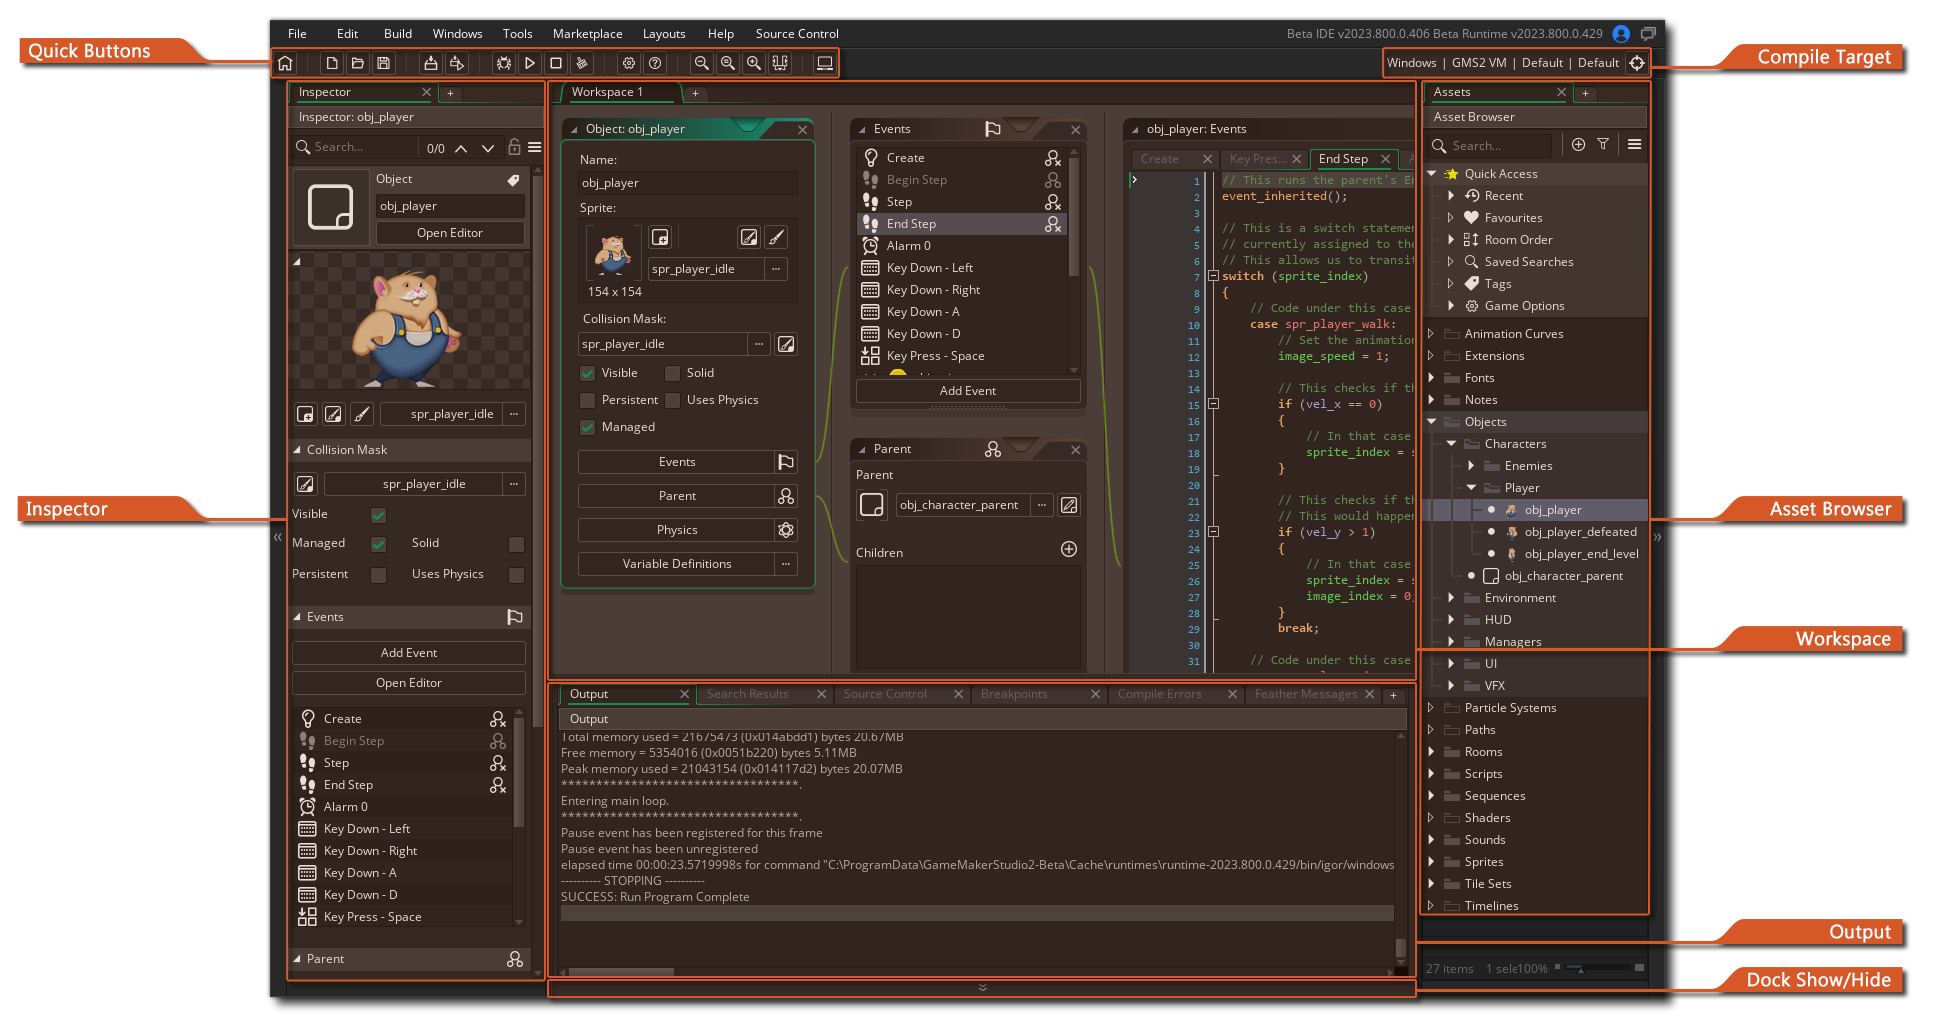
登录并开始一个新项目后,GameMaker会带你进入最初的工作区,一些基本窗口停靠在IDE上。 一般来说,工作区只是一个区域,你可以在工作时组织你的游戏的不同资源。
如您所见,初始工作区位于屏幕顶部的选项卡上(你可以通过双击标签来重命名它),但是你可以通过点击旁边的![]() 来为项目创建进一步的任务,为任何单个项目提供多个可能的任务。例如,也许你正在处理玩家和几个敌人对象之间的交互,所以你会让玩家在自己的工作区,而敌人的对象在另一个工作区,也许另一个工作区只是为了显示两者都使用的脚本。
来为项目创建进一步的任务,为任何单个项目提供多个可能的任务。例如,也许你正在处理玩家和几个敌人对象之间的交互,所以你会让玩家在自己的工作区,而敌人的对象在另一个工作区,也许另一个工作区只是为了显示两者都使用的脚本。
工作区的另一个重要特点是,你可以在标签上点击 ![]() ,然后仍然按住鼠标按钮把它从 IDE 主窗口拖到自己的独立窗口,如果你在使用比如说多个显示器,就可以非常容易地组织事情。你还可以通过把标签拖回第一个窗口,把这些二级工作区窗口合并到主窗口中。
,然后仍然按住鼠标按钮把它从 IDE 主窗口拖到自己的独立窗口,如果你在使用比如说多个显示器,就可以非常容易地组织事情。你还可以通过把标签拖回第一个窗口,把这些二级工作区窗口合并到主窗口中。
注意 虽然你这样做的时候看起来有两个 IDE 实例在运行,但它们都是 同一个项目 ,你不能在一个项目中使用另一个项目,除非你特别打开两个 GameMaker 的实例。
当您第一次启动GameMaker时,您的工作区中已经填充了几个窗口,这些窗口将"停靠"到IDE。下面将简要介绍这些窗口:
 选择这些选项中的任何一个都将为您创建一个给定类型的新的空资源,并突出显示名称字段,以便您可以立即给予名称。请注意,在默认情况下,您可以通过单击
还有一组与工作区中某些内容的显示方式相关的首选项,这样您就可以自定义它的外观以及一般工作流的某些方面。您可以在下面的页面中找到这些首选项:
而在任何工作区中,你可以随时通过右键点击任何地方的![]() 来调用右键菜单,这将打开下面的菜单:
来调用右键菜单,这将打开下面的菜单:
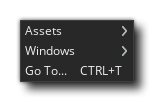
单击 资源 将在 资源浏览器 中打开您可以创建的所有资源的列表,选择其中任何一个将为您创建该资源,并将工作区聚焦在该资源的编辑器窗口上。如果单击 窗口 选项,您将看到工作区中所有当前打开的窗口的列表,您可以选择其中任何一个窗口,使工作区聚焦于该窗口。最后,您可以看到 转到 选项将打开以下窗口:
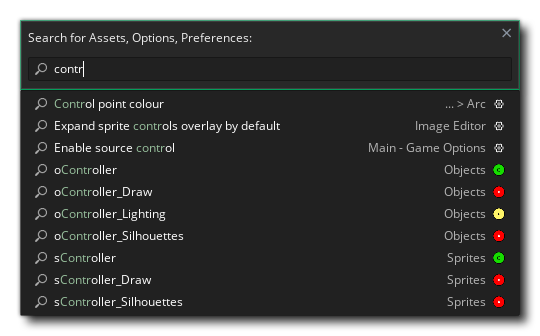
此窗口允许您通过项目中的每个资源、函数、游戏选项和首选项搜索您输入的搜索词。例如,输入“图标”作为搜索词将显示项目中所有名称中有“图标”的项目,例如:如果一个精灵是 spr_Icon_Play,那么它将显示在这里,对象 "obj_Iconoclast" 也将显示在这里,您甚至可以看到不同图标的游戏选项,如 "IconForhdpi"。单击筛选列表中显示的任何项将在当前工作区中打开该项,或者如果已经打开,则将工作区集中在该项上。
请注意,您也可以使用快捷键 /+t 来打开“转到”窗口,并且列出的项目数(默认情况下)设置为最多16个。可以在常规首选项的“转到”部分中更改此最大限制以及其他搜索选项。
有关工作区导航的详细信息,请参阅 IDE 输入和导航一节。
我们在上面简要地提到,您可以将许多窗口停靠到当前工作区窗口中,并且可以取消停靠那些已经停靠的窗口。例如,如果单击顶部的资源浏览器选项卡上的![]() 并将其拖动到当前工作区的左侧,您将看到它变成了一个自由浮动窗口。
并将其拖动到当前工作区的左侧,您将看到它变成了一个自由浮动窗口。
 反之亦然,如果您将某些窗口拖动到工作区的侧边(或底部) ,那么它们将被停靠,这意味着它实际上成为 IDE 窗口覆盖的一部分,不再是独立的。当你这样做的时候,你拖动窗口到你想停靠的区域,它会突出显示你可以停靠窗口在那里:
 通过这种方式,您可以创建一个个性化的 IDE 体验,适合您的工作流程和做事方式。值得注意的是,所有停靠窗口都可以通过单击停靠窗口旁边的按钮(在本页顶部的图片中高亮显示)来隐藏/解除隐藏,或者你也可以使用 IDE 顶部的快速按钮
![]() 来隐藏/解除隐藏所有停靠窗口,还要注意的是 IDE 会记住会话之间的停靠窗口。
来隐藏/解除隐藏所有停靠窗口,还要注意的是 IDE 会记住会话之间的停靠窗口。
注意: 当您更改编辑器时,一些窗口将从停靠栏上消失,如在房间编辑器中。然而,当您返回到编辑器的时候,他们将在停靠栏上再次打开。
下面我们列出了默认情况下可以使用 GameMaker 的快捷按钮。这些按钮可以在 IDE 的顶部找到,它们代表了许多你在 GameMaker 工作时使用的最常见的命令(注意这些按钮大部分也有相同的菜单选项) :
| Opens The Start Page in a new workspace. | |
| Create a new project. | |
| Open a previously created project. | |
| Save the current project. Note that by default GameMaker will save your project automatically (depending on the Preferences that you have set) and this button is simply so you can force a save at any time. | |
| This will compile the current project and create an executable package (or packages) for the target platform. It will first open the file explorer so that you can select where you want to save the project and then compile the game. See the section on Compiling for more information on setting up the compile targets. | |
| This will create an executable, just like the option above, and then it will launch that executable on the target platform. | |
| Clicking this will test-run your current project along with the debug module. Use this to test and debug your game. You can find more about the debug module from the section on The Debugger. | |
| Clicking this will test-run your project on the chosen target platform. | |
| This button can be used to cancel the compilation of your games to the target module, or (on certain targets only) to stop the game while it is running after it has been compiled. | |
| Pressing this button will clear the current asset compiler cache. GameMaker stores images, sounds, scripts, etc. between use in a cache so as to save time when testing your game as it will only re-compile those things that have been changed before testing. However, this cache may become corrupted or "stale" over time, or you may wish to do a full test with no caching being done previously, in which case you can clear the cache by pressing this button. 重要 It is recommended that you always clear the cache before creating the executable for any target platform. | |
| Clicking this will open up the Main Game Options Editor. Note that this is only the main, general, options for the current project, but you may also have platform specific options being listed as a part of The Asset Browser. | |
| Click this to open the manual (or alternatively, press F1). | |
| This will zoom the focused workspace out to make everything smaller (you can also achieve this holding down Ctrl / Command and using the mouse wheel | |
| This will reset the focused workspace to be 1:1 again. | |
| This will zoom the focused workspace in to make everything larger (you can also achieve this holding down Ctrl / Command and using the mouse wheel | |
| This will toggle all the docked elements between hidden and unhidden. | |
| This will toggle laptop mode on and off (This will only appear if you are currently using a laptop - see the section on IDE Input And Navigation for more details) |