Creating A Marketplace Tutorial
Creating a tutorial is similar to creating a regular Marketplace asset package, only now you have to add in specific included files as well as include an initial tutorial page (and an optional video page). The Tutorial workspace will look something like this: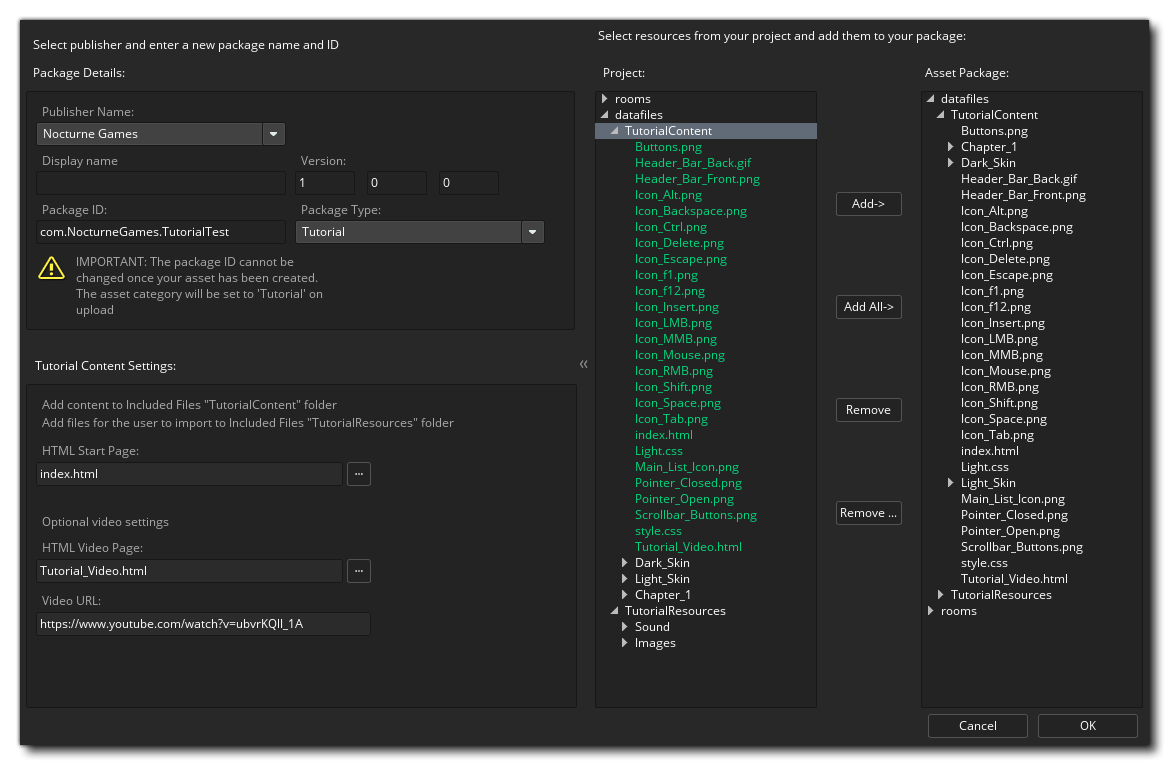 As explained above for general Marketplace Assets, you need to select a publisher and then give your tutorial a name and a unique ID (reverse URL format), and then in the "type" dropdown select Tutorial. This will then give you additional options to add a base HTML file to start the tutorial from as well as an (optional) video file and URL. The video file should use the template supplied from the Marketplace - as should the rest of the tutorial - which you can get here, and when the user loads the tutorial, the video will be loaded into a separate frame within the IDE. Note that the pages you give for the start page and the video page are relative paths within the Included Files, and you can open an explorer to choose something other than the default ones that GameMaker populates the fields with.
Actually creating your tutorial will require you to add Included Files into your tutorial project, and these have to be added in a very specific way for the IDE to properly detect which files are to be used for the tutorial. The basic folder structure is shown in the image below: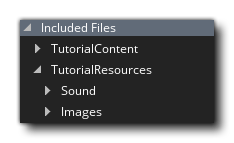
So, we have two main folders:
- TutorialContent: All your tutorial HTML files, the CSS for styling them, and the images required for them (not the images required for resources, but the ones to be displayed within the tutorial), as well as the video template if required, go here. You can have sub-folders as well if you wish to split the tutorial into chapters, for example, but you should have at least one base HTML file to be used as the start page for the tutorial.
- TutorialResources: This folder has a further two sub-folders in it for Images and Sound assets. If your tutorial requires the user to add a sprite (for example) and you want to include it in the tutorial then you would place the image resource in the Images folder. These folders are imported into the tutorial project and when the user opens the sprite editor and goes to add an image, the default path for the explorer window will be to this location, making it easier for the user to find the necessary assets.
For your tutorial to work within the IDE you must have this folder structure as well as have a base HTML start page with a CSS file for styling. There are a number of special links that can be used within your tutorial projects which will skip to parts of a video, or open the manual on a specific section or function, and these are all given in the official Tutorial templates from the Marketplace.
IMPORTANT! We strongly suggest that you download the Tutorial Templates from the Marketplace before attempting to create your own tutorials. They contain examples of all the important parts of the HTML as well as CSS and images to recreate buttons and menus within the tutorial, leaving you free to worry about the content rather than how to display it.
Once you have set up the included files and supplied the required information you can click Okay and the tutorial will be uploaded to the Marketplace, opening a workspace on the asset listing when finished so you can edit it and add icons, text, screenshots, etc... Once the tutorial asset has been published, users will be able to find it within the Tutorials section of the Start Page, where it can be downloaded and installed.